Water damage repair is one of the most common reasons homeowners call in professional help. A burst pipe, flooding due to a storm, or even an old hot water heater can all lead to extensive home water damage.
Once the water source is stopped and the electricity disconnected, work can begin on repairing the damage. This typically includes drying the area, removing drywall, carpeting and padding, and sanitizing the space. Visit https://oneofakind.pro/ to learn more.
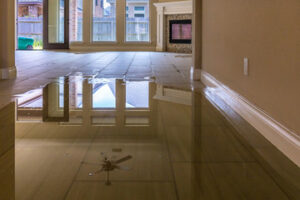
1. Remove the Water
The first step in repairing water damage is to remove the water from the area. This can be done using a vacuum cleaner or a dehumidifier, depending on the size of the room and how much water is present. It’s important to remember that any items that were touched by the water can become breeding grounds for mold or mildew, so they should be thoroughly cleaned (if possible) or thrown out.
It’s also a good idea to open the doors and windows of the affected room to help air it out and speed up the drying process. This will also help to prevent the spread of mold, which can be very toxic for humans and animals.
For players who want to skip the sponge method, there are a few plugins and mods available for Minecraft that can forcibly remove water from the world. WorldEdit, for example, is a popular tool for Bukkit, Forge, and Fabric users that allows players to use the /removenear water command to quickly remove all liquids in their world. However, using this tool is technically considered cheating and is not recommended for players who want to remain legit or play in a Bedrock edition of the game.
2. Dry the Area
After you remove as much water as possible, the next step is drying the area. This helps prevent long-term problems such as fungal growth and structural damage, and it also protects the health of occupants.
The first step in the drying process is to assess the extent of the damage and plan the scope of work. This is often done by a professional who will use specialized moisture detection and measurement equipment. For example, a non-invasive moisture meter will measure the moisture content of walls without drilling holes in them. This can help determine whether or not the walls need to be removed.
If possible, it is best to remove items such as furniture, mattresses, box springs, documents, electronics, and fabrics from the water damaged area to allow them to dry more quickly. However, some of these items may not be salvageable and should be discarded. It is also helpful to open windows and doors to accelerate the drying process. Fans and dehumidifiers can also be used to remove excess moisture from the air.
Wet walls can be difficult to dry and must be treated as a safety issue. If a wall is too wet, it can collapse or cause further damage. This is why it is important to hire a professional company that uses advanced tools and industry-approved techniques.
If you notice a ceiling sagging, it is essential to evacuate the room as soon as possible. A ceiling that is wet can collapse, especially if it is located in an attic or basement.
3. Clean the Area
In order to prevent further water damage, it’s important to remove all the moisture from the affected area. This can be done by removing all the standing water with sponges and mops, if necessary, moving any furniture out of the way of the water and using fans to circulate the air and speed up drying. If the problem is severe, a dehumidifier may be required to really dry out wood and other materials. Moisture left unchecked can cause more problems behind walls and in other hard-to-reach areas, including encouraging mold to grow.
After all the water is removed, it’s time to start cleaning up the damaged area. This includes determining which items can be salvaged and which will need to be discarded. If the water damage was caused by black or sewage water, anything it touched will immediately become a bio-hazard and will need to be disinfected.
If the problem isn’t addressed quickly, it can lead to structural issues with your home and severe health hazards for you and your family. Mold and mildew will begin to grow, wood will swell, and metal surfaces may rust or corrode.
During the cleanup and sanitization process, professionals will use personal protective equipment to ensure they aren’t exposed to harmful bacteria or germs. They will also sanitize all of the areas that were affected by water and treat for any signs of mold. This is typically what takes the longest amount of time in a water damage repair and restoration project. It’s critical that the cleanup and sanitization is completed before beginning any repairs or construction. This helps to protect the health of your family, pets and employees while ensuring the affected area is clean and ready for reconstruction.
4. Repair or Replace the Damaged Materials
If possible, try to save items like furniture or other appliances that have been soaked in water. But if they are beyond saving, or they have mold or mildew on them, you should dispose of them as soon as possible to avoid further damage. This is particularly important with porous materials, such as carpeting and insulation, as they will probably need to be removed and discarded if they’ve been saturated by water.
If you find that any materials can’t be saved, or if you’re unsure whether they’re salvageable, it’s best to call in a professional to assess the situation and make recommendations. They’ll typically have the equipment necessary to remove any standing water and dry out the affected area, as well as the skills and experience to spot and repair any additional damage to your home.
While you’re waiting for professionals to arrive, you can start to clean up the mess that water has created. Remove any spoiled food, dirty laundry and other garbage, and sanitize anything that came into contact with floodwaters or mud. Be sure to disinfect surfaces with bleach or a commercial product, and don’t forget to clean any windows and doors that were opened during the flooding.
If you’re able to, it’s also a good idea to move any valuable items to an unaffected part of the house or to a friend or family member’s home until the water damage is repaired. This way, you can rest assured that your belongings are protected from further harm. It’s also a good idea to delay any plans to redecorate the affected areas until the water has been completely cleaned and dried. Trying to repaint wet walls or ceilings will likely result in unsightly stains and other problems that will be expensive to fix later on.
5. Clean the Area After Repairs
Water damage repair requires proper cleaning to prevent the growth of mold and other microorganisms. Disinfecting the area before and after repairs is a vital step to ensure that no mold spores linger in the air, which could trigger more mold growth or spread other types of contaminants throughout the house. If the mold is severe, you may need to evacuate the affected room until the problem has been properly solved.
Whether you have Category 1 or Class 4 water damage, a proper inspection is crucial before you begin any restoration work. This includes turning off all electricity and gas supplies in the affected areas, even if the water appears to be clean. This will reduce the risk of a fire or other accidents, especially if the water is contaminated with raw sewage or other dangerous substances.
The next step is to remove the water-damaged materials, such as drywall, carpeting, and flooring. These can be replaced or sanitized and deodorized, depending on the severity of the damage. This may require the removal of personal belongings like furniture and appliances. Depending on the extent of the damage, you may need to replace other structural components, such as the floor or the ceiling.
Once all the damaged material is removed, it’s important to disinfect the area. This can be done with a bleach solution or other commercial disinfectants. After disinfecting, it’s a good idea to wipe down all surfaces in the area with a damp cloth to remove any remaining dirt and debris. Finally, it’s a good idea to use fans and open windows to help increase ventilation and speed up the drying process. This can make a big difference in how long it takes for the water damage to be fully repaired.